Thursday, June 20, 2013

Penguin Party Hats and Penguin Party Fun!!!!!

More penguin themed stuff from the birthday party!  Who doesn't love party hats for a birthday party?

We made our own and they turned out adorable!!!!!!!!!


How to Make:
 
1.  Cut out penguin shape from black construction paper. (a combined oval and circle)
 
2.  Cut out black strip about the width of a ruler and long enough to go around child's head. You will need two strips for each hat if using construction paper.  Tape or glue them together so they are long enough.  Then glue to the penguin near the bottom.
 
3.  Cut a slightly smaller penguin shape out of cardboard and glue to the back.  This will help it stand tall when the child is wearing it.
 
4.  Cut out a smaller white oval shape and glue on for belly.
 
5.  Using a one-hole punch, punch dots out of colored paper for eyes. 
 
6.  Cut a small orange triangle for the nose.
 
7.  Cut out flippers from black paper and glue to the back so they stick out to the side slightly.
 
8.  Cut feet out of orange paper and glue to bottom.  When the feet are dry, bend the feet up where feet meet the black paper as if the penguin were standing on them.
 
9.  Cut a triangle out of colored paper to make a party hat for the penguin.  Glue this to the (front) top of the penguins' head. 
 
10.  Decorate hat as you choose.  (polka dots, stripes, plain, etc.)
 
11.  To make tassel for the penguin hat: take a colored string about a foot long and fold it four times.  Tie a not in the middle.  On one side of the knot, cut the string just a little bit below the knot.  Now, trim the tassels to the length desired.  Glue knot to the back of the penguin hat.
 
12.  When children come to the party, fit a hat on them and have fun!!!!!!!
 
 
MORE PENGUIN FUN!
 
 
The kids got to play Pin the Tummy on the Penguin.
 
The adults played a game seeing how many words they could get out of "Penguin Birthday Party".  The prize for the winner was a can of sardines wrapped in white paper.   I drew little fish on the can and wrote "Penguin Food".   (forgot to take a picture). 
 
The children got Penguin Party Favors (see previous blog post).  These also worked great as a tie down for the helium balloons. 
 
I should mention, we had everything penguin.  Our lunch was even breaded fish sandwiches to complete the theme.  They were served on black plates with white and black polka dotted cups and napkins.
 
And, of course, no penguin party would be complete without a Penguin Cake!!!
 
This was my first attempt at decorating a cake.  Didn't go great; didn't go horrible, but turned out pretty cute and yummy, too!
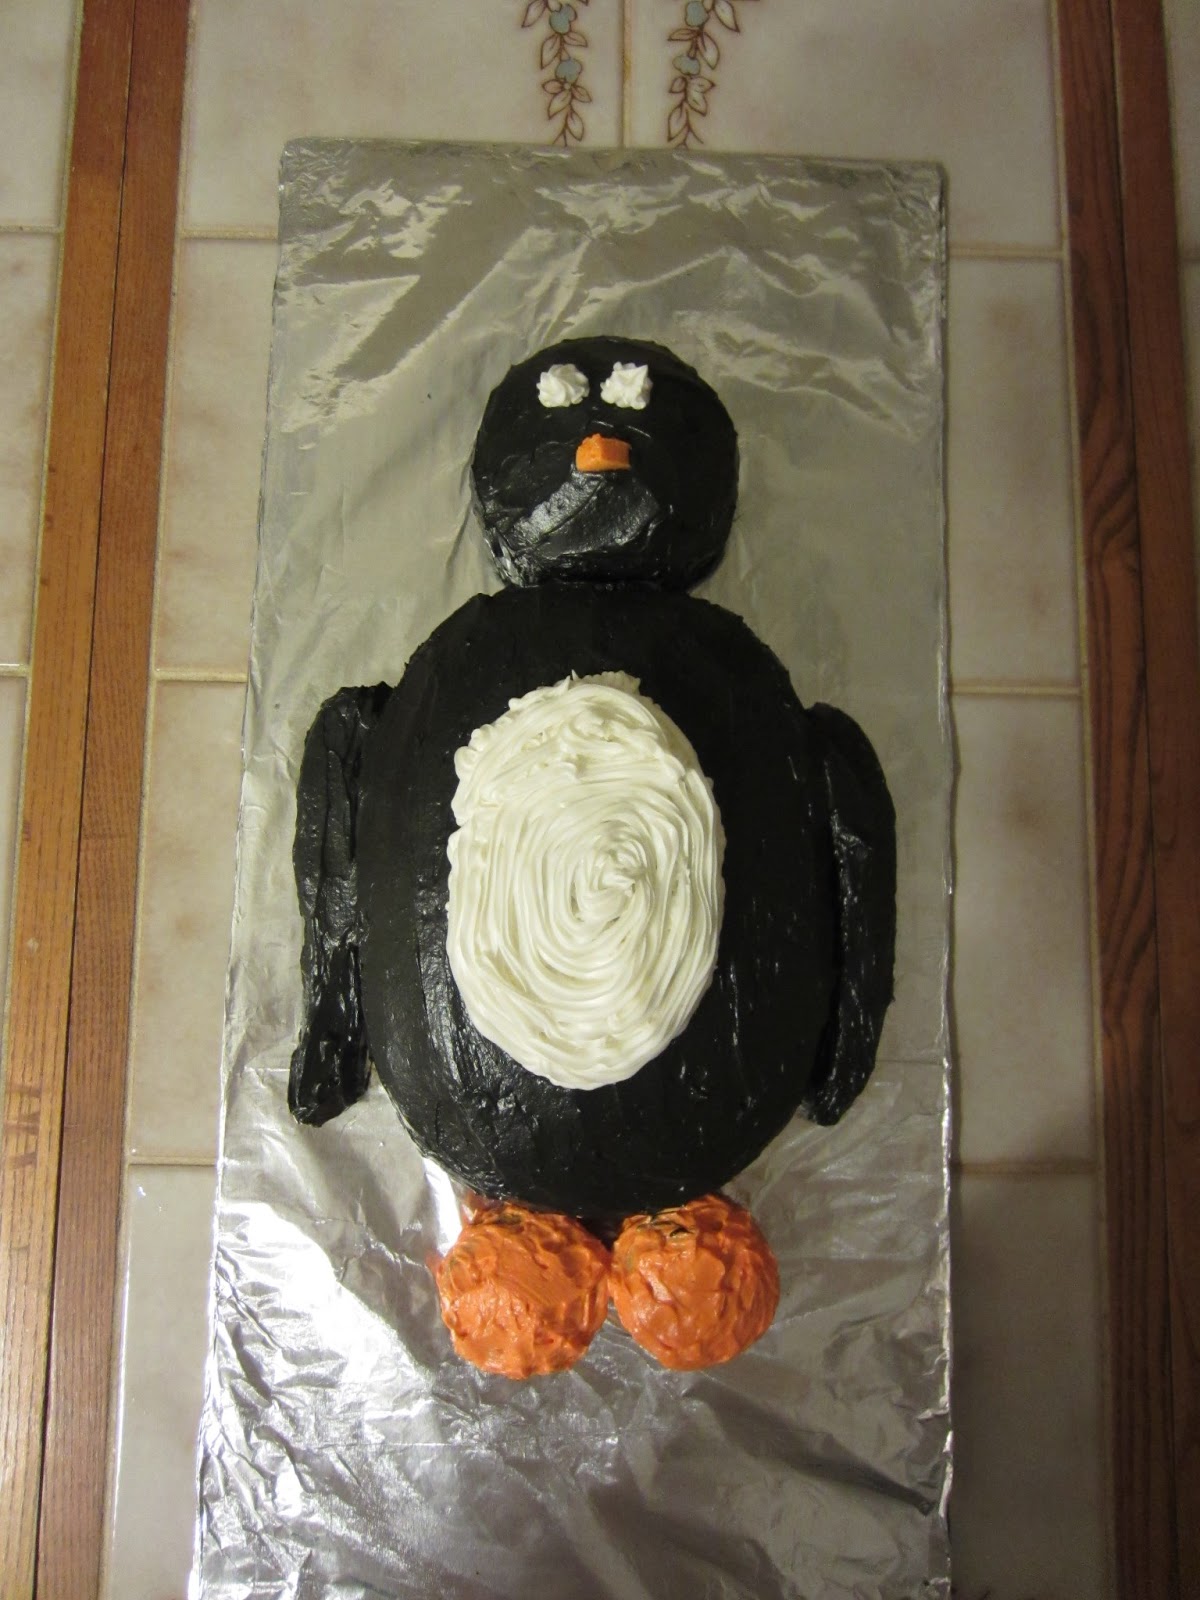


I'm sure glad I used easy shapes for this cake.  I'm not sure I'll be able to do anything more advanced.  The head was a small Corningware pan and the body and oval pan.  The feet were two cupcakes.  I originally had planned to outline the wings with white (on just the body).  However, since I goofed up my first batch of cake, I had plenty cake to use as flippers.  In all my cake decorating nervousness I forgot to add vanilla.  As I was mixing up more batter for cupcakes (I was planning to make penguin cupcakes too. A friend had shown me an adorable picture of them from a book.  Let's just say I didn't read the directions very thoroughly, couldn't find all the supplies I needed, and my quite quick attempt at ten o'clock at night on a busy and exhausting day, didn't work.)
 
Anyways, after that tangent, ten minutes after the cake was in the oven was when I realized I had forgotten the vanilla, so I added it after it had been in the oven.  It actually turned out, too.  But the perfectionist in me, couldn't let it go.  Yep, I made another.  As you can see, one flipper turned out fine.  I cut it from the side of the first cake.  The second one broke and every attempt to cut from the cakes middle, failed.  It turned out the best it could with patchwork.  The nose was a starburst cut in half.  It pleased the birthday girl, but I'm requesting cake decorating classes.  I have lots of questions.
 
It was very yummy! And we ate it on specially painted Penguin Party Plates that the own birthday girl did!  She loved the craft!!!!!!  I know what you are thinking, "you ate cake and vanilla/chocolate combo ice cream on plates that were painted by a three-year-old?"  Yep!  I've got you curious, don't I?  Don't worry.  I wouldn't feed food on anything where the paint could chip off into food.  This has been one of me favorite craft ideas ever!!!!!  And I'm sorry to disappoint you, but I'm not posting pictures or instructions, yet.  It's an idea I'm writing up as an article to submit to a magazine.  If I don't sell it, I'll post it hear.  I'll keep you posted!
 
 
Love It!


Tuesday, May 28, 2013

Penguin Party Favors!

I've been getting ready for my little girls third birthday.  We are doing a penguin theme.  Yes, even though it is a summer birthday.  I got the idea after watching Happy Feet with her.  I decided to do the penguin theme after I saw two pans in my cupboard - - if I make the cakes in them, I think I could put it together for a good penguin shape (I think).  I probably should pull the pans out and really take a look at them, before I set to work at making the cake.  So, I opened my mouth and asked if she wanted Mommy to make her a penguin cake for her birthday.  The answer was yes.  This was several months ago already and she hasn't let me forget it.  Now I'm stuck.  I'm not a cake decorator and have never done anything more than just slapping regular frosting on a regular cake - so this shall be interesting.  I've had my good friend, who is also my daughter's baptismal sponsor make them in the past.  She is a professional cake decorator.   But being a Mom, I want to make one for her.  Wish me luck.

Ok, after going off on a tangent about how this whole idea started....here is a fun craft that we put together for the party favors for the kids at the party - toilet paper penguins for Penguin Party Favors!

First, put black construction paper around the TP roll.  Then cut out a white oval for the penguin belly.  Next, cut out wings out of black construction paper.  I folded them in half lengthwise and also folded the tip where I wanted to glue them to the body of the penguin.  This helps the wings jut out a bit from the body. 

I first planned to just decorate The TP roll as a penguin, and put a cardboard base as the feet and fill it with candy.  While I was shopping for candy for the favors, I found the containers of mini M & M's and decided they would make cute feet.  I put the top down and put a strip of double-stick
 tape along the candy container and put the TP roll over the candy and stuck it in place.  For extra security, I put some tape over the bottom of the container inside the toilet paper roll and taped it to the inside of the TP roll. 

I then found some big suckers and wrapped black tissue paper around them for the head.  I placed the stick into the TP roll. That part was a bit difficult with the big candy container inside.  I did end up cutting out round circles and putting the penguins eyes and nose on the circle and gluing/taping them to the TP roll and sucker.  I probably could have just glued them to the tissue paper, but was in a hurry to get them done so this allowed me to just curve the paper over the sphere shape and not deal with perfecting the head with the tissue paper the way I had planned.  I was hurrying before the baby woke from a nap.  My little girl had lots of fun helping with the craft!!!!!  It's a great way to help them be involved.

Love It!

Outdoor Fun and Learning Fun!

I don't spray my yard for those beautiful flowered weeds.....Dandelions.  And probably never will.  I don't like chemicals and don't want to spend the money.  No, they are not my favorite and I'd rather them not be there, but they are and they will remain.  They are still part of God's creation.  The Bible does tell us that we will have thistles and stuff chocking out the good stuff in this sinful world.  So, I might as well make the most of them since they are there.

Admit it.  Don't you remember having some fun with those gold yellow flowers too when you were a kid?  I do.  Whether it was picking a beautiful Dandelion bouquet for my parents or holding the flower under my chin and saying, "I've been eating butter"... or something like that from the yellow glow.  I just remember my mom doing something like that based on a Norman Rockwell painting with a boy holding a flower up to a girl. (I think).  I tried to Google it but didn't find what I was looking for.  And at least I think that is where the idea came from.  I guess it's just a vague memory.

These first pictures come from an activity I remember my mom doing with me as a child on warm summer days.  I specifically remember sitting on our wraparound front porch curling dandelions stems.  It was fun.  We'd pick the dandelions, preferably the longer stemmed ones.  It didn't matter whether they were buds, blossoms, or the white seeded part.  We'd pick off the flowered part and discard, gather a bucket of water, and then tear the stem in half and drop in the bucket of water.........and fun little curly cues would appear.  However, not all will curl.


My three-year old and I enjoyed it!  The next thing I knew we were turning the curls into fun little rings on our fingers and toes!  LOVED IT!


A few days earlier, we had been making a game of who could pick the most dandelions the fastest.  I, of course, let her win.  Most of the time.  And, just maybe, by picking them we will prevent a few less Dandelions in the future since those poor flowered weeds won't get the opportunity to blow their white puffy seeds around.  Later we had some outdoor learning fun with the bouquets we'd gathered.  Since I've been trying to teach her letter recognition, I started forming letters with them and quizzing and teaching her the letters of the alphabet.  The letter's with loops and curls are a bit more tricky than ones with just straight points, but it was still fun and a learning opportunity!  Sometimes I'd just break of a flowered part to make the letter more cute!


You can use it for learning spelling words too!


Have fun playing and learning!

Love it!


Saturday, May 25, 2013

What's Up?

What's up as of recently?

I know it's been awhile since I've posted.  O.k., two months to be exact.  But, that's what comes with life and being a mom.  Also, I've been reading some good books and spending time on my writing projects.  And for the third spring now, something that has been consuming a lot of my time, organizing craft projects for our church's VBS program this summer for a 150 kids of all ages.  That's 750 craft projects.  Thankfully, I've got some great helpers.  I've got at least ten different projects planned for daily crafts and a few extras, too.  In the future, I may share some of those.  We'll see how the kids take to them.   I should mention, we come up with our own crafts.  We don't use what the publishing house sells.  I personally like to make it more fitting to the theme, lesson, or Bible verse. It makes me very thankful that blogs exist, because they can be a great place to find ideas.  But (sometimes), my mind actually comes up with a few ideas of it's own.  Oh, and I'm having the older kids do the pocket verses I posted a while back!  Fridays daily theme verse is, Jesus says, "You will be my witnesses....to the end of the earth."  Acts 1:8  (Concordia Publishing House VBS 2013 - Go Tell It On The Mountain Where Jesus Christ is Lord!) It may not be the most fun craft, but I chose it for the lesson in being a witness.  They will MAKE ONE for themselves and one to PASS IT ON.  And it's kind of nice to be able to let the kids creativity flow on there own some, too.  Sometimes, I think I'm crazy to take on this task, especially this year with having my second babe at home, but honestly I LOVE IT! and wouldn't have it any other way.

I still have some ideas that I've not had time to implement and post, but I've had a few other random creative thoughts that have occurred to me.  Kind of silly, but fun.  At least I think so.  Easy ones, and easy to post.  All I had to do was grab the camera and go.  Now, on the this three day holiday weekend and finding some time to relax out of town, I'm sitting down to do them.  Only to find, (though I was sure I remembered packing it in my purse) that I must not have brought my camera cord to upload my pictures.  So, here's to the typing and adding the pictures later...and then....posting (hopefully next week).  Unless, I find a camera cord that matches mine among our families stuff or find I packed it anyway in one of those "special" spots. 

Since, I don't have the camera cord, this is kind of the reason for today's more personal post.  And because I found in the beginning of typing my first post, that I just randomly started typing about the events of life.  I tend to do that now and again.  I guess it's the lengthy and winded writer in me.  I decided it was more fitting alone and by its self.  I also have some ideas I've wanted to post, but have decided to try them as "how to's" to publish in a magazine on my journey to try and become a published writer.  If I don't sell them, I'll come back to post here. :)


So...NEW POSTS AND CREATIVE THOUGHTS COMING SOON!

Love it!  and LOVING life :) 

Wednesday, March 27, 2013

Hoppy Easter Cupcakes

Ever wonder how the Easter Bunny carries all those eggs?  A wheelbarrow of course! 
 Let's have some yummy and tasty Easter fun!
 
This was my all time favorite Easter activity that my Mom did with me as a kid.  Today I had the fun of sharing it with my own daughter for the first time, and now all of you, too.


First, you will need your favorite cupcake recipe or mix. I always use my favortie chocolate cake recipe - Crazy Cake (no egg needed recipe.)  It's so yummy and moist (even great with out frosting).  For the sake of saving time this close to Easter, I'm not posting the recipe now.  If anyone would like it please leave a comment and I'll be sure to post it!


Supliess Needed:
Green colored frosting (I do the simple powdered sugar, butter and milk recipe)
Coconut colored with green food coloring - GRASS
Jelly Beans - EGGS
Lifesavers - WHEELS (I used gummy life savers this time for my 3 yr. old)
Gum Drops - HUB CAPS
Peeps Marshmallow Bunnies
Colored Toothpicks
(I forgot to buy colored toothpicks, so used regular, but colored is more fun.)
 
 
Begin by frosting the cupcake.  Then dip the cupcake in the cocunut.  Next, add the Jelly Beans to the top.  I dipped the Jelly Beans in a bit of frosting first to help them stick.  You can also leave the cocunut off and just put the "eggs" on the green frosting for someone who does not like cocunut. 
 
 
Next, cut the round tip off of the gum drop and stick a tooth pick into the flat end, then add a Lifesaver.  Note: The gummy candies I used for my hub caps this time around were not gumdrops.  They were some type of sour gummy candy that I thought looked cute, but they really ended up being too big and close to the same size as the lifesaver.  It was not as cute and next time I will buy gum drops again.  Stick the tooth pick with candy through the bottom of the cupcake.  Put another toothpick with candy on the other side of the cupcake accross form the first to make wheels.
 
 
Last, place two toothpicks into the side of the cupcake at about the middle or slightly higher.  Then slide on your Peeps Bunny.  I've also done it with other Peeps like the Chic, but the bunny is my favorite!  You could also if you want turn the bunny around and have him "pulling" a wagon. 
 
 
Show off! Share! Eat! Enjoy!  They are so cute!!!!!!
 
Happy Easter!
 
 
Love It!
 

Tuesday, March 26, 2013

A Poem for March

A poem I wrote for a contest this month (didn't win), but thought I'd share....


March Snowman

March winds, oh, how they blow,
Whirling and a twirling with snow.
Calling me to come and play.
We’ll have so much fun today.
Make some snowballs.  Stack them high.
Build a snowman to reach the sky.
Add some eyes, a nose and arms.
Add a scarf to keep him warm.
The sun comes out, how warm it felt.
My March snowman starts to melt.

Love It!

Wednesday, March 6, 2013

Simple Supper

This is a recipe I came up with one night when I had a plentiful supply of garden green beans.  Enjoy

Green Bean Homeade Hamburger Helper

1 lb ground beef
desired amount of garden fresh green beans or frozen
1 can cream of mushroom soup
Velveta cheese (or cheddar) as desired
dried rosemary, to taste

Cook green beans in separate pot of boiling water.
Brown hamburger (I usually add some onion or minced onion flakes) and drain.
Stir in mushroom soup and green beans, simmer.  Sprinkle with desired amount of rosemary flakes.
Place Velveta cheese on top and cover with a lid.  Heat a little extra if needed.  Enjoy.